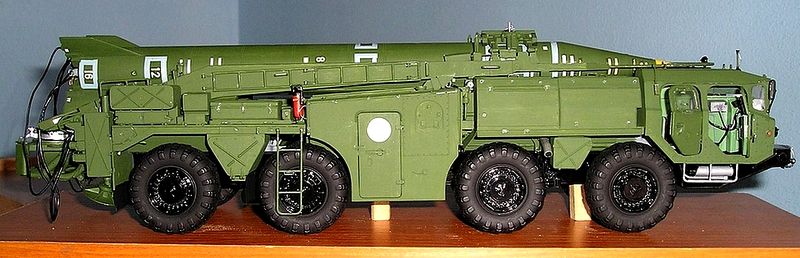
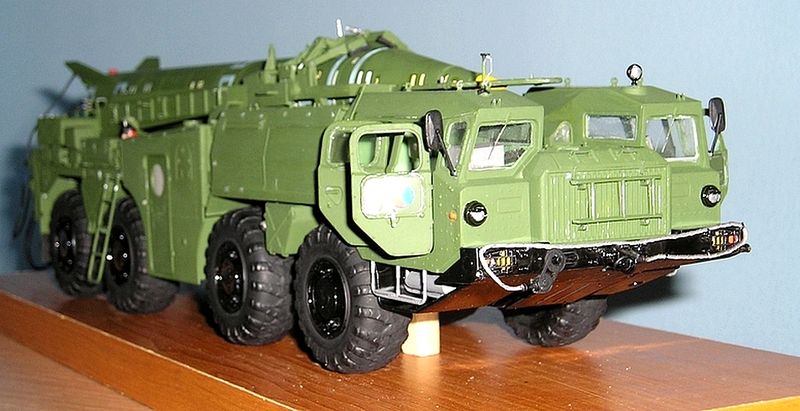
Raketový komplet 9K72 s OZ 9P117M (SCUD B ) 1:35 DRAGON
Raketový komplet 9K72 ELBRUS s OZ 9P117M s raketou 8K14 ( Scud B)
This article is written because some people interested in rocketry contacted me.I made an article about 331.tdb and here I published my model,and here is a short description of the modifications.
Good photos of the equipment are necessary for the build.
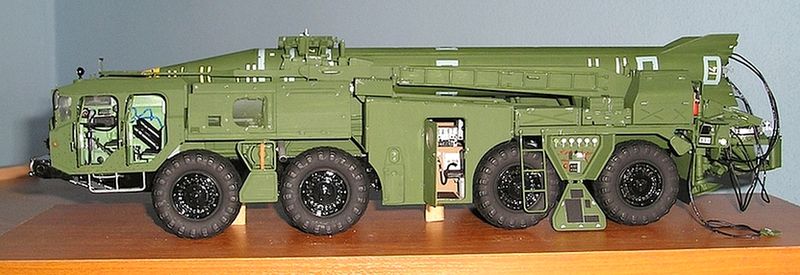
I built my second model of the 9P117M launcher ( Maz 543 SPU M)) from Dragon in 1:35 scale for the 8K14 ( Scud B ) missile.I didn't have any sheet metal for the first one so I made everything out of plastic. Today,when there are metal parts,I decided to use them.
I bought the second kit and it was a shock.In the first kit made by Dragon the mouldings were without defects,but what was in the second kit amazed me. It was made by Shanghai Dragon and it had nothing to do with the quality of the moulding.Lots of burrs,significant holes from the ejectors,window film almost opaque,very rough surface on the mouldings.
I was already disappointed after seeing the first kit how the cabins - driver,commander pal. Group,Operator and APD are all contrived.Nothing to do with the equipment.If someone decides to close everything up and use etchings for the exterior finish then it's something to behold.Alas if the cabins are left open.
I thought that I would remove the remaining shortcomings of the kit by buying Eduard etchings,but there is another problem.The parts of the etchings that are supposed to improve the model are incomplete.The driver's and commander's cab are well done. Also the parts for the surface of the model are good.The horror is at the operator's and APD's cab.And to make it worse,they have fitted all the parts for the cabs and so it is an even bigger horror.The scanning counters are designed as front walls,so the depth is non-existent.The cabinets for the counters have to be made by everyone.
Evaluation of the kit in terms of workmanship:
Launcher chassis:
-take it as it is, there is no point in making it, there is nothing to see over the wheels anyway
-keep in mind that for all tasks, and it didn't matter if it was technical or firing, it was specified that the wheels of the front axles had to be in the plane of the vehicle, there could be no sideways rotation - because they were arresting certain devices with the launching table and they required this plane, the controlling authority would not even allow to start the task
-recommend putting the model on a mat because you will find that you have no way of picking it up after it is assembled - you will gradually damage it
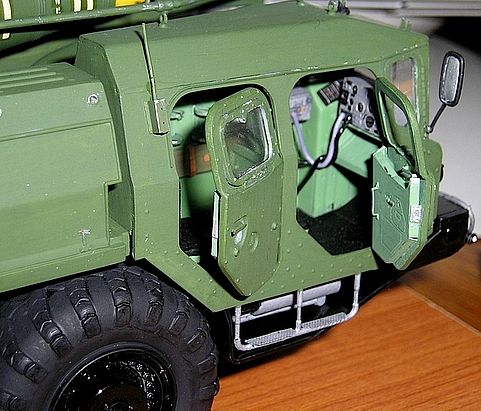
1.Driver's cabin:
-it's partly made up
-adjustment - use etchings and finish according to photos,finish the seats - only the driver's seat was sprung,cylinders for combined start and other small things of air duct and instrumentation
2.Cabin VPS:
-invented
-finish the seats and mainly use etchings,make the missing parts according to the photos of the cabin
3.Modification of the cooling part, filtration and tank
-modification according to Eduardo
-use the etchings and especially the photos on the covers from above to place the brackets on the covers
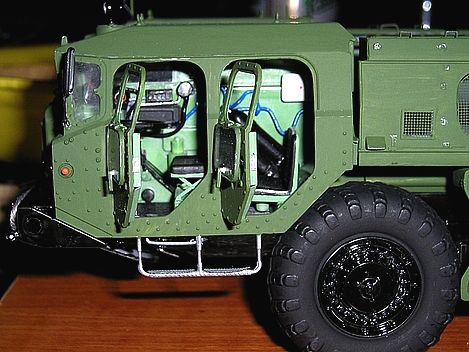
4.Operator cabin:
-absolute nonsense,throw it all out and the whole inside has to be made new,be careful the fender cover has a radius according to the front wall,I chose a radius about two millimeters larger behind the edge of the front part edge and made a new fender cover and its back wall
-based on etchings and good photos of the cab equipment
-the seats are nonsense-make new ones-one belongs behind the door on the left and the other on the wheel fender on the right by the door,above it is a box for documentation
-add the instrument boxes and a shelf on the left side next to the apparatus
-make a box for the AKB of the gyrocompass 1G9 on the left side, its dimensions are characterized by the door on the front wall of the cabin (from the entrance door on the left)
5.SPO:
-complete with everything according to the photos and attention to the modernization,depends which version you are doing,on the SPO cover I only indicated the technological labels ( they are numerous with silver printing )
6.Hydraulics and support controls:
-use the photos and make parts and for the D38 box ( the whole panel ) and for the D39 box a pressure gauge,but there is also a profitable counter for the commander of the firing group to control the rocket ( lifting,leveling and turning )
7.Launch table:
-it is smaller than it should be in the given scale-an unsolvable modification is connected to the cradle
-finish the cable holders- they are in etchings,modify the fire wedge from the bottom,use etchings
-don't put the B8 part on the table and the one underneath-it's the base blocks for the wheels, leave just the bare block holders from the etchings-it's aesthetic
-leave a piece on part D31 to connect the pressure hoses of the breakaway coupling, just drill it to glue the hoses, don't use etch 8 - it's bad ( thin )
8.Cabin APD
-extraction is nonsense for the first one I fitted it,but I closed the terraces because even in reality the cabin was closed for most of the tasks,only the cap on the D2 part was open - hinged on the chain for air ventilation to the APD engine
-there was a bulkhead in the cabin to the right of the entrance door, dividing the cabin into the transport section and the APD engine section
-there was only one seat, otherwise there must be good photos of the whole area to edit
9.Tanks and cabinet for AKB
-adjustment according to Eduardo,use etchings and especially photos on the covers from above-use photos and etchings
-don't use etch 31 on our machines I haven't seen this modification.only the first series machines of the Soviets had it
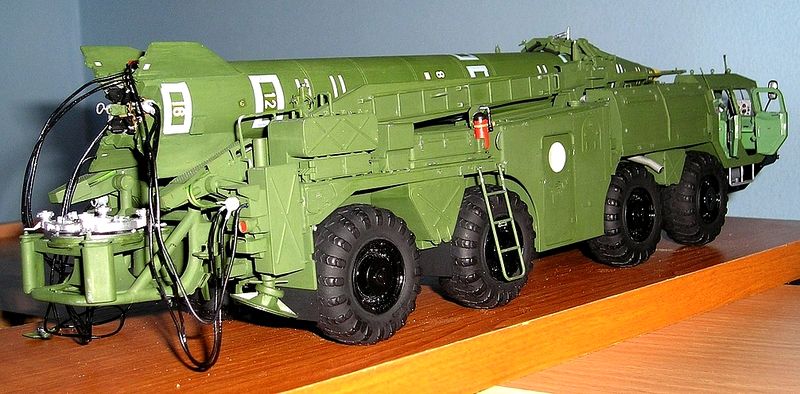
10.Rocket cradle:
-complete according to the photos, but in the front part of the jaws, use etched parts, the kit is missing the control of the fitigu-its control parts are in etched parts so finish according to the photos
-another big deficiency is that the whole front cradle support is missing in the kit, which is behind the fuel tanks, here the cradle is supported and secured by locks during the ride - make a new one according to photos
-make the locks from the bottom of the cradle and they must fit into the front cradle support,otherwise the rocket is lying on the vehicle
-hydraulic cylinder ( the thin part of D21 is short - I extended it by about a centimeter, it will depend how you want the rocket, if like on MíTZ - I have it, or raised to some standby position, then the extension is necessary )
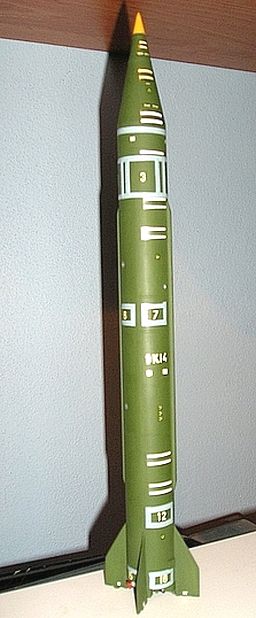
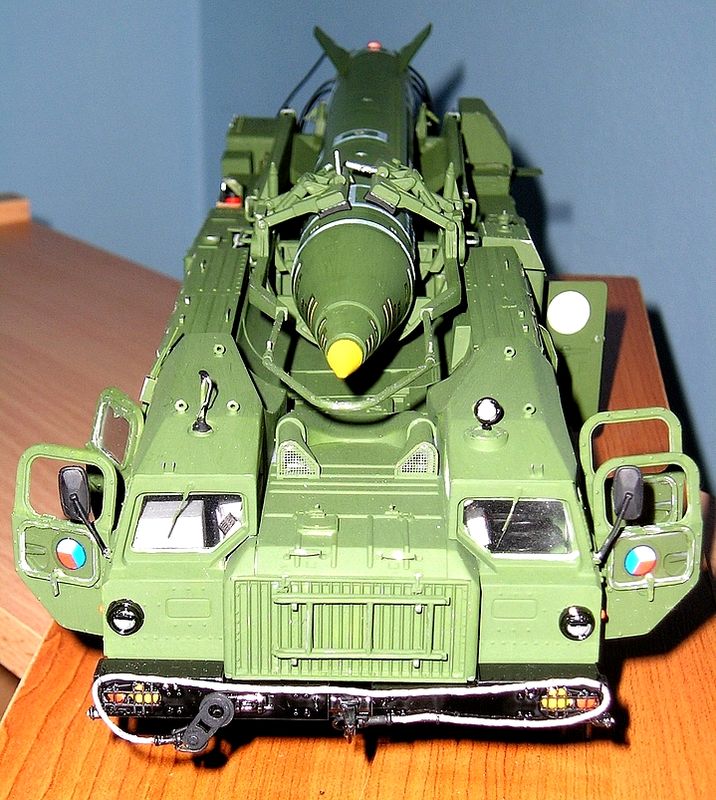
11.Rocket:
-determine which grooves characterize the split of the carrier,a good picture is on the internet,the rest of the frosted and reground
-the hull is about 2 mm larger in diameter-you can't do anything about it
-the span does not fit is small and this is the stumbling block,stabilizers - adjust the span but also the shorter end edge of the stabilizer,adjust the angle of attack towards the end edge,after this adjustment the rocket will not fit on the launching table-stabilizers will not allow it
-I have adjusted the span in the given scale so that even with the fuselage it is 53,7 mm and the rocket lies on the OZ as in the MITZ and I have adapted the others to this task
-use etched lids, but the center lids on the carrier are missing, I used the etched lids for the lower part of the rocket ( they are the same ) and left the etched lids on the lower part of the carrier
-engraved new grooves on the instrument section and glued the lids - pay attention to the position of the lids in relation to the cable channel
-engine part-make a new rocket motor nozzle-what is in the kit part is nonsense-drill it out and make a description below,don't use the etch part 102
-make the wiring between the OZ and the rocket-without it the device is a big nonsense,the original clearance cables were three,our production two on one end
-make a new breakaway coupling-do not use etched part 103 is thin,it should be about 1 mm thick and drill holes about 0,8 mm for high pressure hoses
-make the high pressure hoses for the breakaway coupling, be careful to leave a piece of the kit on the vehicle, just drill through it to glue the hoses
-finally, I taped the lids with grey tape-description on the internet ( the original tape used to be 6 to 8 cm wide)
They don't recommend an upright rocket.You don't know the rules of emergency and you get a pointless thing-hybrid.
Colouring of the model:
-I'm not an advocate of academic painters and therefore don't use weighted methods
-the whole launcher is green - chameleon green ( paint for laminate ) I used Humbrol 117,driver's cab and fire group commander's cab Humbrol 120,operator's cab and APD Humbrol 153 ( it is darker )
-chassis frame Humbrol 117
-bumper, front chassis frame cover plates, wheel discs and some metal accessories - gloss black Humbrol 21
-you can see the difference in the shade of green paint used on the rocket and on the vehicle, the rockets were sprayed with classic acetone or synthetic paint
-cables black, end caps of vetting cables grey, others green, if the cables were of Czechoslovak manufacture they were two and medium grey
-high-pressure hoses black, end caps green and breakaway coupling silver or Humbrol 81
-colour accessories - for the battery there were two firing groups - red and blue and each group made accessories according to the vehicle's affiliation,accessories were allowed only in the superstructure of the equipment and where they were not visible at first glance,so on individual OZs the colour of the given group was painted - instrument panel at the driver,control levers in the cabin,valve taps at the SPO
Exceptional colouring:
-the 331.tdb was made in 1988 for combat live firing
-deformation paint was applied with engineer washable paints - dark green,light green,black and ochre were used
-the paint was applied to the entire vehicle but covered with a rocket transport tarp, the tarp extended from the front of the cradle to the sides of the operator's cab and APD, covering all the boxes on the right and left side of the vehicle and the entire launch table
-the paint was applied to the top of the vehicle away from the centre ( cradle ) and the rocket,the same field was applied over the rocket cover
forum.fortifikace.net
Warning:
- take note,the cabs were made of fiberglass,so there will not be any scuffs on the metal,the paint scuffs were only on the metal parts of its accessories,carabiners for clamping the sail,lockers,handles,etc.
- the rocketry was one of the CSLA's watched material and had to be given due attention - that's why it always looked like new
So a few observations about the EDUARD etchings:
Scud B exterior set #35539
Sheet 1/5
31a 35 -grid on AKB-it was not on the CSLA versions,it was only on the first pieces of the USSR and maybe somewhere-keep an eye on the photos of the machine
Sheet 2/5
45 -extinguisher holder-length of the clamping tape does not correspond to the actual need-the extinguisher was clamped to the holder as a whole,the cylinder and nozzle nozzle were tied together with the tape,the same problem is on sheet 3/5
Sheet 3/5
30 and 75-part 75 is the cover of the 30 box with drawers and the drawers are two each,when the rocket is loaded there are cables-must be open,better to keep the part with the kit and just use the 75
37 - misunderstood ? - the transverse spirit level is stored here to determine the transverse tilt of the vehicle
Sheet 4/5
43 -the protective cage for the headlight finder is low,the headlight does not go there
8 -unrealistic to fit the rear part and the hydraulic support for the launch table together-leave the kit part
Sheet 5/5
20 and 21 -unsuitable-thin as far as contact area for gluing,they don't hold and fall off,they can't take the strain of the cables for launching and the same for the hose grips
3 -wrong ending at the back missing the counter pin for the launch table stop,this pin is used to reach one axis for the rocket - the launch table and the rocket cradle
99 -doesn't meet length - I used only the end parts,the span of the rocket stabilizers is wrong and should be 53,7 mm,so when the rocket is adjusted then the part doesn't meet length
-also the tabs on the rocket don't cut off-they are the feet at the root of the stabilizers on which the rocket stands in standby #1 and at launch
-the rocket is missing 4 pieces of the lid to the center of the carrier
102 -a rocket motor nozzle extension-a narrow strip-should be about 1.5 cm wide and end with a diaphragm in the motor at its taper and the motor nozzle not extending over the edge of the rear of the nose
-adjust ( gently cut off ) the covers of the sockets - after connecting the cables they are open and during the launch the cables are pulled out and the springs close them
Scud B interior set #35540
Sheet 1/4
25 -looking to the left of the steering wheel
35-handbrake-fits to the right of the driver's seat, at the marked location to the left of the seat is the fluid filler neck
Sheet 3/4 and 4/4 -worst condition,already in the kit is made nonsense,operator's cab and APD cab are made up
H34,H35 -are not used and the cabins have to be closed over the chassis, the space between the cabins is filled with apparatus
H40,41 and E30 -invented
11 -not suitable-missing the third part of the 2V12 rocket checking and programming apparatus
-upper part 19-distribution console is shorter on the left and should extend partly above the third part of the 2V12
-on the right side of 2V12, there is one missing SUGU pulse - APD control by the operator
55 - how to glue it, if the box for AKB is missing and it is on the top of the box, first make the box and then glue it, the depth and height must be taken from the outside where the door to AKB is.D1
41 and 32 -is the call device R 124,but there is only one in the vehicle and it is correctly at the fire group commander and it works with the radio station R123,the rest of the operators on just his cabinet A1,they are missing at the driver,in the cab of the APD and the operator was A2- to be made including connecting cables
53 -drinking water container holder - to be completed as in the commander's and here in the operator's under the seat on the right two pieces
You can find everything in ATM Militari - here are some nice cockpits - look there.But you have to take some texts with a grain of salt.
The full description of the device and usage is at 331.tdb:
forum.fortifikace.net
Registration required or no photos.
Good photos of the equipment are necessary for the build.
I built my second model of the 9P117M launcher ( Maz 543 SPU M)) from Dragon in 1:35 scale for the 8K14 ( Scud B ) missile.I didn't have any sheet metal for the first one so I made everything out of plastic. Today,when there are metal parts,I decided to use them.
I bought the second kit and it was a shock.In the first kit made by Dragon the mouldings were without defects,but what was in the second kit amazed me. It was made by Shanghai Dragon and it had nothing to do with the quality of the moulding.Lots of burrs,significant holes from the ejectors,window film almost opaque,very rough surface on the mouldings.
I was already disappointed after seeing the first kit how the cabins - driver,commander pal. Group,Operator and APD are all contrived.Nothing to do with the equipment.If someone decides to close everything up and use etchings for the exterior finish then it's something to behold.Alas if the cabins are left open.
I thought that I would remove the remaining shortcomings of the kit by buying Eduard etchings,but there is another problem.The parts of the etchings that are supposed to improve the model are incomplete.The driver's and commander's cab are well done. Also the parts for the surface of the model are good.The horror is at the operator's and APD's cab.And to make it worse,they have fitted all the parts for the cabs and so it is an even bigger horror.The scanning counters are designed as front walls,so the depth is non-existent.The cabinets for the counters have to be made by everyone.
Evaluation of the kit in terms of workmanship:
Launcher chassis:
-take it as it is, there is no point in making it, there is nothing to see over the wheels anyway
-keep in mind that for all tasks, and it didn't matter if it was technical or firing, it was specified that the wheels of the front axles had to be in the plane of the vehicle, there could be no sideways rotation - because they were arresting certain devices with the launching table and they required this plane, the controlling authority would not even allow to start the task
-recommend putting the model on a mat because you will find that you have no way of picking it up after it is assembled - you will gradually damage it
1.Driver's cabin:
-it's partly made up
-adjustment - use etchings and finish according to photos,finish the seats - only the driver's seat was sprung,cylinders for combined start and other small things of air duct and instrumentation
2.Cabin VPS:
-invented
-finish the seats and mainly use etchings,make the missing parts according to the photos of the cabin
3.Modification of the cooling part, filtration and tank
-modification according to Eduardo
-use the etchings and especially the photos on the covers from above to place the brackets on the covers
4.Operator cabin:
-absolute nonsense,throw it all out and the whole inside has to be made new,be careful the fender cover has a radius according to the front wall,I chose a radius about two millimeters larger behind the edge of the front part edge and made a new fender cover and its back wall
-based on etchings and good photos of the cab equipment
-the seats are nonsense-make new ones-one belongs behind the door on the left and the other on the wheel fender on the right by the door,above it is a box for documentation
-add the instrument boxes and a shelf on the left side next to the apparatus
-make a box for the AKB of the gyrocompass 1G9 on the left side, its dimensions are characterized by the door on the front wall of the cabin (from the entrance door on the left)
5.SPO:
-complete with everything according to the photos and attention to the modernization,depends which version you are doing,on the SPO cover I only indicated the technological labels ( they are numerous with silver printing )
6.Hydraulics and support controls:
-use the photos and make parts and for the D38 box ( the whole panel ) and for the D39 box a pressure gauge,but there is also a profitable counter for the commander of the firing group to control the rocket ( lifting,leveling and turning )
7.Launch table:
-it is smaller than it should be in the given scale-an unsolvable modification is connected to the cradle
-finish the cable holders- they are in etchings,modify the fire wedge from the bottom,use etchings
-don't put the B8 part on the table and the one underneath-it's the base blocks for the wheels, leave just the bare block holders from the etchings-it's aesthetic
-leave a piece on part D31 to connect the pressure hoses of the breakaway coupling, just drill it to glue the hoses, don't use etch 8 - it's bad ( thin )
8.Cabin APD
-extraction is nonsense for the first one I fitted it,but I closed the terraces because even in reality the cabin was closed for most of the tasks,only the cap on the D2 part was open - hinged on the chain for air ventilation to the APD engine
-there was a bulkhead in the cabin to the right of the entrance door, dividing the cabin into the transport section and the APD engine section
-there was only one seat, otherwise there must be good photos of the whole area to edit
9.Tanks and cabinet for AKB
-adjustment according to Eduardo,use etchings and especially photos on the covers from above-use photos and etchings
-don't use etch 31 on our machines I haven't seen this modification.only the first series machines of the Soviets had it
10.Rocket cradle:
-complete according to the photos, but in the front part of the jaws, use etched parts, the kit is missing the control of the fitigu-its control parts are in etched parts so finish according to the photos
-another big deficiency is that the whole front cradle support is missing in the kit, which is behind the fuel tanks, here the cradle is supported and secured by locks during the ride - make a new one according to photos
-make the locks from the bottom of the cradle and they must fit into the front cradle support,otherwise the rocket is lying on the vehicle
-hydraulic cylinder ( the thin part of D21 is short - I extended it by about a centimeter, it will depend how you want the rocket, if like on MíTZ - I have it, or raised to some standby position, then the extension is necessary )
11.Rocket:
-determine which grooves characterize the split of the carrier,a good picture is on the internet,the rest of the frosted and reground
-the hull is about 2 mm larger in diameter-you can't do anything about it
-the span does not fit is small and this is the stumbling block,stabilizers - adjust the span but also the shorter end edge of the stabilizer,adjust the angle of attack towards the end edge,after this adjustment the rocket will not fit on the launching table-stabilizers will not allow it
-I have adjusted the span in the given scale so that even with the fuselage it is 53,7 mm and the rocket lies on the OZ as in the MITZ and I have adapted the others to this task
-use etched lids, but the center lids on the carrier are missing, I used the etched lids for the lower part of the rocket ( they are the same ) and left the etched lids on the lower part of the carrier
-engraved new grooves on the instrument section and glued the lids - pay attention to the position of the lids in relation to the cable channel
-engine part-make a new rocket motor nozzle-what is in the kit part is nonsense-drill it out and make a description below,don't use the etch part 102
-make the wiring between the OZ and the rocket-without it the device is a big nonsense,the original clearance cables were three,our production two on one end
-make a new breakaway coupling-do not use etched part 103 is thin,it should be about 1 mm thick and drill holes about 0,8 mm for high pressure hoses
-make the high pressure hoses for the breakaway coupling, be careful to leave a piece of the kit on the vehicle, just drill through it to glue the hoses
-finally, I taped the lids with grey tape-description on the internet ( the original tape used to be 6 to 8 cm wide)
They don't recommend an upright rocket.You don't know the rules of emergency and you get a pointless thing-hybrid.
Colouring of the model:
-I'm not an advocate of academic painters and therefore don't use weighted methods
-the whole launcher is green - chameleon green ( paint for laminate ) I used Humbrol 117,driver's cab and fire group commander's cab Humbrol 120,operator's cab and APD Humbrol 153 ( it is darker )
-chassis frame Humbrol 117
-bumper, front chassis frame cover plates, wheel discs and some metal accessories - gloss black Humbrol 21
-you can see the difference in the shade of green paint used on the rocket and on the vehicle, the rockets were sprayed with classic acetone or synthetic paint
-cables black, end caps of vetting cables grey, others green, if the cables were of Czechoslovak manufacture they were two and medium grey
-high-pressure hoses black, end caps green and breakaway coupling silver or Humbrol 81
-colour accessories - for the battery there were two firing groups - red and blue and each group made accessories according to the vehicle's affiliation,accessories were allowed only in the superstructure of the equipment and where they were not visible at first glance,so on individual OZs the colour of the given group was painted - instrument panel at the driver,control levers in the cabin,valve taps at the SPO
Exceptional colouring:
-the 331.tdb was made in 1988 for combat live firing
-deformation paint was applied with engineer washable paints - dark green,light green,black and ochre were used
-the paint was applied to the entire vehicle but covered with a rocket transport tarp, the tarp extended from the front of the cradle to the sides of the operator's cab and APD, covering all the boxes on the right and left side of the vehicle and the entire launch table
-the paint was applied to the top of the vehicle away from the centre ( cradle ) and the rocket,the same field was applied over the rocket cover
forum.fortifikace.net
Warning:
- take note,the cabs were made of fiberglass,so there will not be any scuffs on the metal,the paint scuffs were only on the metal parts of its accessories,carabiners for clamping the sail,lockers,handles,etc.
- the rocketry was one of the CSLA's watched material and had to be given due attention - that's why it always looked like new
So a few observations about the EDUARD etchings:
Scud B exterior set #35539
Sheet 1/5
31a 35 -grid on AKB-it was not on the CSLA versions,it was only on the first pieces of the USSR and maybe somewhere-keep an eye on the photos of the machine
Sheet 2/5
45 -extinguisher holder-length of the clamping tape does not correspond to the actual need-the extinguisher was clamped to the holder as a whole,the cylinder and nozzle nozzle were tied together with the tape,the same problem is on sheet 3/5
Sheet 3/5
30 and 75-part 75 is the cover of the 30 box with drawers and the drawers are two each,when the rocket is loaded there are cables-must be open,better to keep the part with the kit and just use the 75
37 - misunderstood ? - the transverse spirit level is stored here to determine the transverse tilt of the vehicle
Sheet 4/5
43 -the protective cage for the headlight finder is low,the headlight does not go there
8 -unrealistic to fit the rear part and the hydraulic support for the launch table together-leave the kit part
Sheet 5/5
20 and 21 -unsuitable-thin as far as contact area for gluing,they don't hold and fall off,they can't take the strain of the cables for launching and the same for the hose grips
3 -wrong ending at the back missing the counter pin for the launch table stop,this pin is used to reach one axis for the rocket - the launch table and the rocket cradle
99 -doesn't meet length - I used only the end parts,the span of the rocket stabilizers is wrong and should be 53,7 mm,so when the rocket is adjusted then the part doesn't meet length
-also the tabs on the rocket don't cut off-they are the feet at the root of the stabilizers on which the rocket stands in standby #1 and at launch
-the rocket is missing 4 pieces of the lid to the center of the carrier
102 -a rocket motor nozzle extension-a narrow strip-should be about 1.5 cm wide and end with a diaphragm in the motor at its taper and the motor nozzle not extending over the edge of the rear of the nose
-adjust ( gently cut off ) the covers of the sockets - after connecting the cables they are open and during the launch the cables are pulled out and the springs close them
Scud B interior set #35540
Sheet 1/4
25 -looking to the left of the steering wheel
35-handbrake-fits to the right of the driver's seat, at the marked location to the left of the seat is the fluid filler neck
Sheet 3/4 and 4/4 -worst condition,already in the kit is made nonsense,operator's cab and APD cab are made up
H34,H35 -are not used and the cabins have to be closed over the chassis, the space between the cabins is filled with apparatus
H40,41 and E30 -invented
11 -not suitable-missing the third part of the 2V12 rocket checking and programming apparatus
-upper part 19-distribution console is shorter on the left and should extend partly above the third part of the 2V12
-on the right side of 2V12, there is one missing SUGU pulse - APD control by the operator
55 - how to glue it, if the box for AKB is missing and it is on the top of the box, first make the box and then glue it, the depth and height must be taken from the outside where the door to AKB is.D1
41 and 32 -is the call device R 124,but there is only one in the vehicle and it is correctly at the fire group commander and it works with the radio station R123,the rest of the operators on just his cabinet A1,they are missing at the driver,in the cab of the APD and the operator was A2- to be made including connecting cables
53 -drinking water container holder - to be completed as in the commander's and here in the operator's under the seat on the right two pieces
You can find everything in ATM Militari - here are some nice cockpits - look there.But you have to take some texts with a grain of salt.
The full description of the device and usage is at 331.tdb:
forum.fortifikace.net
Registration required or no photos.
Reklama

Reklama


This post has not been translated to English yet. Please use the TRANSLATE button above to see machine translation of this post.
Jenom možná trošku v souladu s dnešními trendy mírně zašpinit by to sneslo.
Join us
We believe that there are people with different interests and experiences who could contribute their knowledge and ideas. If you love military history and have experience in historical research, writing articles, editing text, moderating, creating images, graphics or videos, or simply have a desire to contribute to our unique system, you can join us and help us create content that will be interesting and beneficial to other readers.
Find out more